Showing posts with label food. Show all posts

Friday, April 19, 2013

Food: ChickPea Fries

Hi MadeByGirl readers! Its Teann from Teann Ingram Photography. Whenever I go to a restaurant, I always walk in thinking, I'll try a new item on the menu. But when the waitress comes to take the order, I panic and go with something classic instead. Last week, I actually tried a new item! Chickpea Fries, which I fell in LOVE with. 

They are somewhat healthier than regular potato fries, though they are normally deep-fried so I think that might cancel out the "health" factor. Luckily, you can bake these fries too!


You can buy chickpea flour from a specialty store (I've heard Whole Foods has it in bulk) or grind dried chickpeas in a coffee/spice grinder, like I did here.


Remember to slowly sprinkle in the flour mixture while whisking constantly to avoid clumps. Switch to a wooden spoon and continue stirring until the mixture starts to separate from the walls of the pot.


While the chickpea mixture is cooling in the fridge, make the curry aioli. Make sure to SLOWLY add the oil to the egg yolk. This is the most crucial part.


Oh yum, look at the colour of those fries!

Now enjoy!

Chickpea Fries
1 cup chickpea flour, sifted 1 tsp salt 1/4 tsp pepper 1 tsp smoked paprika 1 1/4 tsp turmeric 2 cups water 2 tbsp olive oil Favourite oil for frying (I use peanut)

Curry Aioli *Note: This aioli contains raw egg yolks.
3 egg yolks pinch of salt pinch of pepper 1/2 lemon 3/4 cup lightly flavoured oil (I use safflower) 3/4 tsp turmeric 1/4 tsp cumin 1/4 tsp coriander

1. Grease an 8x8 square dish, set aside. Mix water with olive oil in a medium saucepan and bring to a boil. Meanwhile, whisk together chickpea flour, salt, pepper, paprika, and turmeric in a large bowl. Once the water is boiling, gradually add the flour mixture, whisking frequently to avoid lumps. Switch to a wooden spoon and continue to stir for about 5 - 7 minutes, or until the mixture separates from the sides of the pan. Pour mixture into the greased dish. Smooth and level with a wooden spoon. Set aside to cool for 10 minutes before placing in the refrigerator.

2. *If using the oven method, preheat oven to 425˚F. While the chickpeas' are cooling, its time to make the aioli. You can certainly whisk by hand, but its takes quite an effort. Instead, I use my KitchenAid mixer. (You can also use a blender or a food processor). Place the eggs in the bowl with the whisk attachment. With the mixer on high speed, SLOWLY add the oil to the eggs, one drop at a time. Wait for the oil to be mixed with the eggs before adding the next drop of oil. Continue this process until the eggs lighten in colour and the texture starts to thicken slightly. Once you have hit this stage, you can start pour the oil in a thin steady stream until all of the oil has been added. Add the rest of the spices and mix well. Store in the fridge until ready to serve.

3. Heat 1 inch of oil in a skillet over medium heat. Cut the chickpea mixture into strips, about 4 inches long and 1/2 inch wide. Fry strips on both sides until golden brown, about 3 minutes per side. Remove from oil and drain on paper towels. Place fries in a warm oven, while frying the next batch. Serve immediately with curry aioli.

*4. Line baking sheet with parchment paper and place chickpea strips, leaving 1 inch space between. Bake for 18 - 20 minutes or until crispy. Serve immediately with curry aioli.


-post by teann ingram

Tuesday, April 9, 2013

Food: The Best Egg Sandwich Ever

Hi you guys! Lauren here, with the BEST egg sandwich you'll ever eat (seriously). I'll pre-apologize to any vegetarians out there, because the key ingredient here is bacon. Specifically, bacon jam... We recently came across this magical substance when eating lunch at one of our favorite neighborhood cafes, and my husband didn't waste any time trying to make it himself at home. 

It's nothing short of delicious and a serious upgrade to the regular old egg sandwich. I mean, what's not to love about bacon--in jam form--on an egg sandwich after all? It's surprisingly simple to make (promise!), so keep reading for the recipe... 

open-faced micheopen-faced miche

First things first, you chop up the bacon and cook it. Then you're going to cook it down with onions, garlic, brown sugar, maple syrup, balsamic and grainy mustard. It's eventually going to turn into a jam as it slowly cooks...  

Bacon Jam Ingredients
1 12-ounce package of center-cut bacon, diced
1 cup sliced onions, half red and half white
2 cloves garlic, minced
1 tablespoon bacon grease from cooking (discard the rest)
1/4 cup packed brown sugar
3 tablespoons maple syrup
1 tablespoon balsamic vinegar
1 tablespoon whole grain mustard
1/4 cup chicken stock, plus 1 tablespoon

Bacon Jam Instructions
1. Cook bacon over medium-low heat, until cooked but not crispy. Discard the bacon grease, but reserve 1 tablespoon of it.

2. Back in the pan, cook onion and garlic in the reserved bacon grease until softened. Add brown sugar and coat the onions.

3. Add maple syrup, balsamic vinegar, mustard and chicken broth. Fold in the bacon and simmer until reduced, about 5 minutes. After thickened and jammy, add the extra tablespoon of chicken stock to thin it back out just a bit.

4. Transfer the bacon jam mixture to a food processor and pulse, just until your desired jam consistency. Store in an airtight jar or container, in the refrigerator, until ready to use.

open-faced micheopen-faced miche

Egg Sandwich Ingredients
Bacon jam
1 slice of miche (large round loaf of French sourdough bread), toasted
2 slices of gruyere 
1 kale leaf, torn and sauteed until crispy
1 fried egg

Egg Sandwich Instructions

1. Spread bacon jam on toast.

2. Top with gruyere slices, kale and fried egg.

3. Close your eyes and take a big, delicious bite! 


-post & photos by lauren craig

Monday, March 25, 2013

Food: Spring Tarts

I love the official start of Spring was a couple days ago, but I'm usually ready much earlier, like around March 1st--how about you? Lauren here, and today I'm back with a recipe that looks and tastes like spring. Light and flaky pastry dough, lemon- and thyme-flavored ricotta, asparagus, peas, and mint all come together (quite quickly) to make pretty tarts.

 I know this recipe has me eager to plan a girls' brunch or lunch soon, and I hope you'll be adding it to your to-make list too. Keep reading for the details! 

spring tarts

These asparagus and pea tarts are made easy with store-bought puff pastry (from the frozen section) and made delicious with creamy ricotta, fresh herbs, and generous amounts of lemon zest. I love the flavor of lemon paired with spring vegetables, but you can always scale back on the zest a bit if you prefer.

spring tartsspring tarts

There's really not much to it...just a bit of layering of this and that, and baking in between. I love a recipe that yields impressive-looking results but isn't complicated to whip up, and this one falls right into that bucket. 

spring tartsspring tarts

Ingredients
1 sheet of store-bought puff pastry, thawed
A handful of thin asparagus, chopped into 2-3-inch long pieces with stems
3/4 cup ricotta
4 sprigs of thyme, leaves removed from stems
Juice of half a lemon
Zest of one lemon
Salt and pepper
1 egg, beaten
1 cup frozen peas, thawed
Olive oil and white balsamic vinegar
About 10 mint leaves
Fresh parmesan, grated

Instructions
1. Preheat oven to 400 degrees. 

2. Lay a piece of parchment paper on a baking tray. Place the pastry sheet onto the parchment and cut into 4 squares. Score a 1-inch border around the edge of each square and prick once in the middle with a fork.

3. Mix the ricotta with lemon juice, half the zest, thyme, salt, and pepper. Spread the ricotta mixture evenly inside the border of each square. Note that you may not use it all. Top each square with a few pieces of asparagus on the diagonal. Sprinkle with remaining lemon zest and season with freshly ground pepper. 

4. Brush the borders of each tart with the beaten egg, then bake for 15-20 minutes or until golden.

5. Place peas in a small bowl and drizzle with olive oil and white balsamic; toss to combine and season with salt and pepper. Top the cooked tarts with the peas, then finish with mint leaves, a bit of grated Parmesan, and additional lemon zest if desired. 


-Recipe & images by Lauren Craig


Sunday, March 17, 2013

FOOD: SWEET PEA SOUP WITH TARRAGON

Hi Everyone!  Alison here from Heart of Gold Luxury this weekend & I'm very excited to share with you a recipe that will make you crave spring! Plus, it's perfect to try for today on St. Patrick's Day!


During the cold winter months, I crave hearty soups and stews -  meals that will warm you from the inside out; however, come spring, when the temperatures begin to rise and the sun shines just a bit longer, I still love soup, but in lighter versions that include fresh spring vegetables.  This recipe for Sweet Pea Soup with Tarragon is healthy, vegetarian and it comes together in about thirty minutes.   

This soup is delightfully flavored with fresh sweet peas and scented with a bit of licorice flavor thanks to the infusion of tarragon.  I finished it with a dollop of Greek yogurt and a drizzle of extra virgin olive oil - it served as a wonderful light lunch on a day that almost felt like spring here in New York.
 

Sweet Pea Soup with Tarragon
2 pounds peas, fresh if possible
2 tablespoons extra virgin olive oil, plus more for garnish
2 large shallots, chopped
4 cups vegetable broth
3 tablespoons fresh tarragon, chopped
Non-fat Greek Yogurt

Place chopped shallots into soup pot with olive oil.  Allow to cook down and to slightly carmelize  Add the broth, peas and chopped tarragon.  Allow for soup to come to a boil and to cook until peas are tender.  Once peas are fully cooked, transfer to a food processor and pulse until smooth. Garnish with a scoop of Greek yogurt and drizzle with olive oil. Makes about 4 bowls.  


*Recipe slightly adapted from Bon Appétit
                                                                                                   

-post & photographs by Alison 


Wednesday, March 13, 2013

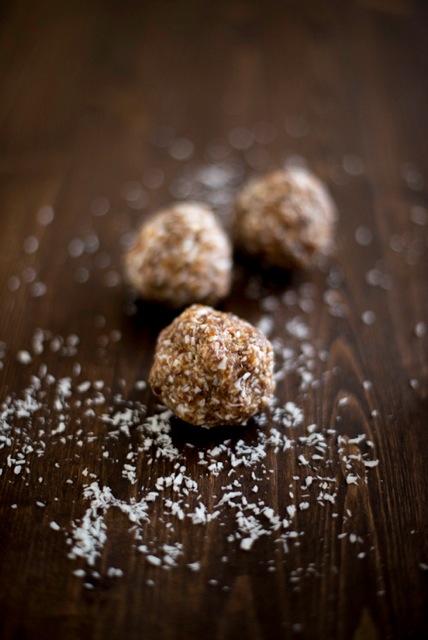
Food: Coconut & Peanut Butter Date Truffles

Hey guys! Its Teann from Teann Ingram Photography. Do you ever have days where you need a pick-me-up snack? Those mid afternoon yawns are such a drag. Most turn to coffee or pop to awaken the mind but I find I feel way better when I eat something instead. These Date Truffles are just the snack to keep your mind going till the end of the work day! 

They are super easy to make and you can add any type of flavoring you want, plus they are all natural and made without sugar and with only a few ingredients :) Below are the recipes for Coconut Date Truffles and Peanut Butter Date Truffles. If you're not a date person, not to worry, all you taste is the goodness of coconut and peanut butter. Yum!


Coconut Truffles - (Makes about 6)
2 cup of dates, pitted
1/4 cup of Almonds, roughly chopped
1/4 cup coconut oil
1 1/2 shredded coconut, unsweetened
1. Start by quickly going through the dates making sure there are no pits left. Even if you buy them already pitted, there are sometimes pieces of the pit hiding. This quick step will save your food processor blade :)

2. Place the dates into the food processor and process until the dates form a large ball. Tear the dates into smaller pieces and add the coconut oil, shredded coconut and almonds. Pulse until combined. You can also use your hands to knead the coconut oil, coconut and almonds together with the dates.
3. Here you can either form truffles or bars. Whichever you prefer :)

Peanut Butter Truffles - (Makes about 6)
2 cup of dates, pitted
1/4 cup of almonds, roughly chopped
1/2 cup natural peanut butter, crunchy
1. Start by quickly going through the dates making sure there are no pits left. Even if you buy them already pitted, there are sometimes pieces of the pit hiding. This quick step will save your food processor blade :)

2. Place the dates into the food processor and process until the dates form a large ball. Tear the dates into small pieces and add the peanut butter and almonds. Pulse until combined. You can also use your hands to knead the peanut butter and almonds together with the dates.

3. Here you can either form truffles or bars. Whichever you prefer :)


-post by teann ingram


Friday, March 1, 2013

Pea Pods Custom Cookies

I think most people love customized stuff right? This particular shop can bring your ideas to cookies! Let's say you're crazy about CELINE handbags - (who isn't?) - Kristie, the owner, can have them made very similar just for you! Sweet!

Based out of New York, her shop is called PeaPods & I managed to pick out my favorites! Let's see, the handbags, the Brooklyn bridge, & the stash of lingerie for Bachelorette parties. 


Which is your fave? Where would you serve these cookies??


-images via  pea pods


Enjoy your weekend!!!


Thursday, February 28, 2013

FOOD: Asian Chicken Lettuce Wraps

Lauren here today, with a crowd-pleasing appetizer for your next get together. Think of this as the healthier sister to the P.F. Chang's version that everyone loves. 

Yes, there are a gazillion copycat recipes of this app floating around, but my take is a little different and still full of plenty of flavor. The best part is how easy it is--the perfect kind of dish to serve up at a party and let your guests help themselves. Keep reading for the recipe!
 
asian chicken lettuce wraps 1asian chicken lettuce wraps 2

Let's start with the ingredients. Most recipes call for ground chicken, which happens to include dark meat. Instead, cook a few chicken breasts to shred so you get the lean, white meat only.

 Shredded carrots and radicchio are an easy way to sneak in some extra nutrients and balance each other out (sweet and bitter). The dressing is where it's all at, though. Dijon mustard and minced ginger pack a lot of flavor, and using light soy sauce cuts out some of the extra salt.

asian chicken lettuce wraps 3asian chicken lettuce wraps 4

To serve, Boston or Bibb lettuce leaves work best as they're naturally curled into the perfect-sized cups. Set out fresh bean sprouts for a low-cal crunchy topping, as well as chopped chives and toasted sesame seeds. 

asian chicken lettuce wraps 5

For the dressing:
1/4 cup low-sodium soy sauce
1 1/2 tablespoons rice wine vinegar
1 tablespoon Dijon mustard
1 tablespoon minced ginger
1 teaspoon crushed red pepper flakes
1 1/2 tablespoons vegetable oil
1 tablespoon toasted sesame oil

For the filling:
4 cups shredded cooked chicken
2 small radicchio, shredded 
2 carrots, shredded with a box grater

For serving:
Bibb or Boston lettuce leaves
Fresh bean sprouts, toasted sesame seeds, and chopped chives for garnish
Sriracha for added heat

Instructions:
1. In a small bowl, combine first five ingredients. Whisk in the vegetable and sesame oil.
2. In a large bowl, mix shredded chicken, radicchio and carrot. Add the dressing slowly, tossing to combine. You may not need all of it. 
3. To serve, spoon chicken mixture into the lettuce leaves. Top with bean sprouts, chives and toasted sesame seeds. 


-Recipes & images by Lauren Craig


Wednesday, February 13, 2013

Pink Velvet Cupcakes with Buttercream Frosting

These cake toppers are so adorable! At first glance I thought, "Can I eat those?" - I'm no baker, what did I know?  So, my husband said, "YES Jen, they're totally edible." Phew. 

Well, how do they taste?? They actually seem to blend right into the butter cream frosting, so you're pretty much just tasting the frosting! I LOVE how they were inspired by the classic candy conversation hearts! Remember those??? 

My husband & I made these together - they're called Pink Velvet Cupcakes with Buttercream frosting. He made the butter cream frosting from scratch & I swear it tastes just like Magnolia. These goodies are also part of the Love Letter Mag we put together - you can see it all here.  


Recipe is below- don't miss it!


Pink Velvet Recipe

1 cup butter, softened
1 1/4 cups sugar
1/4 teaspoon pink food coloring
3 eggs
1 teaspoon vanilla extract
2 1/2 cups all-purpose flour
1 1/2 teaspoons baking powder
1/4 teaspoon baking soda
1/4 teaspoon salt
1 cup buttermilk

Swiss Meringue Buttercream
-adapted from Martha Stewart-

5 egg whites
1 cup granulated sugar
1 lb (4 sticks) butter
2 tsp vanilla

In a large bowl, cream the butter, sugar and food coloring until light and fluffy. Add eggs, one at a time, beating well after each. Beat in vanilla. Combine the flour, baking powder, baking soda and salt; add to creamed mixture alternately with buttermilk, beating well after each addition.
Fill paper-lined muffin cups two-thirds full. Bake at 350° for 23-27 minutes or until a toothpick inserted near the center comes out clean. Cool for 10 minutes before removing from pans to wire racks to cool completely.

Place egg whites and sugar in a metal electric mixer bowl. Set bowl into a pan of simmering water, and whisk until sugar has dissolved and egg whites are hot to the touch (3 minutes). When its ready, you should feel no sugar granules when you touch it.
Transfer bowl to mixer and use a whisk attachment. Beat on high speed until mixture has cooled completely and formed stiff, glossy peaks (10-11 minutes).

Add the butter, 1/2 bar cut in pieces at a time. Beat until incorporated after each addition. It will initially look curdled but don't worry - it will become smooth again with continued beating. Add vanilla, and beat just until combined.

Change to a paddle attachment, and beat on the low speed to eliminate air pockets (5 minutes). 
Frost the cupcakes then top with the cupcake toppers.

If using the frosting within several hours, cover with plastic wrap and set aside at room temperature in a cool environment. Can be stored refrigerated in airtight container for up to 3 days but bring to room temperature and beat for 5 minutes with paddle attachment before using.


-images by jen ramos


Tuesday, February 12, 2013

FOOD: Heart-Shaped Napoleon with Raspberries

Hi everyone! Alison from Heart of Gold & Luxury blog! I'm here with my first post for MadeByGirl!  I am excited to share with you an impossibly romantic dessert to enjoy with your sweetie this Valentine’s day.  The Napoleon is a classic dessert that combines layers of flaky puff pastry, luxuriously rich pastry cream scented with almond and vanilla, topped with plump ruby red raspberries and finished with a dusting of confectioners sugar.

This dessert might look intimidating but it is incredibly easy - you just have to use your creative eye to assemble this confection. This is one recipe that will impress your other half, not to mention your friends and family. In fact, you just might have them wishing that this day filled with roses and chocolates would come around more than once a year.


Ingredients:
16 ounces puff pastry, dethawed
2 cups whole milk
½ cup granulated sugar
1 teaspoon pure almond extract
½ teaspoon pure vanilla extract
Pinch of salt
4 egg yolks
¼ cup cornstarch
1 tablespoon unsalted butter, diced
½ pint fresh raspberries or strawberries

Equipment: Heart-shaped cookie cutter (optional)


For the Pastry Cream:
Combine 2 cups milk, ¼ cup sugar, almond extract, vanilla extract and pinch of salt in a small pan. With stovetop on medium heat, allow for mixture to come to a simmer. Set aside.

In a bowl, combine 4 egg yolks, ¼ cup sugar and ¼ cup cornstarch. Slowly whisk in the warm milk mixture to combine.  Pour mixture back into pan and return to medium heat, stirring constantly.  Pastry cream will begin to thicken rapidly.  Once mixture is thickened remove from heat, add butter and stir until combined.  Pour into a heat-safe bowl and cover with plastic wrap. Be sure to coat the top of the pastry cream with the wrap, otherwise you will have a film that forms on the top.  Allow to cool completely in the refrigerator for at least 3 hours or up to 2 days.


 For Napoleon Assembly:

Preheat oven to 425 degrees.  Line a large baking sheet with parchment paper.  Unroll puff pastry and place on lined baking sheet.  Pierce holes with a fork all over the dough.  Place a heavier baking sheet on top (a Pyrex pan is perfect) and allow to cook for approximately 25 minutes. Pastry is done with it is golden brown.  Allow to cool completely.  Once cooled, cut out pastry into hearts if desired.  Place pastry cream into a sealed plastic ziplock bag.  Cut the tip off and fill one side of the pastry with cream, top with raspberries and then place another piece of pastry on top. Finish with a dusting of confectioners sugar. 


*Makes about 3 to 4 servings depending on size of cookie-cutter

*Recipe adapted from Martha Stewart

Wednesday, February 6, 2013

Food: Mediterranean Bread

Hi all! I am Teann Ingram and I am so excited to be a contributor on MadeByGirl! Its winter here in British Columbia, and it seems Mother Nature can't decide whether she wants it cold or warm - right now its about -12˚C (10˚F) which is a little colder than I would like! Whenever its chilly out, I find I crave something warm and savory. 

This Mediterranean bread is just the ticket on cold days like this! Besides the fact that it looks gorgeous, the combination of the feta, spinach and chopped walnuts are simply delicious. I will warn you now; you will have more than one slice :)


After kneading, the dough should have an elastic feel to it. Push a finger into the dough and if it springs right back quickly you know your dough is perfect! The dough should be smooth but still moist and not dry.


I could eat just the filling all by itself :)


This dough is extremely easy to roll out. If it seems a little resistant, let it rest a few moments before starting to roll again.


Here is the tricky part. When cutting the bread lengthwise start the cut about 2 inches from the top. It’s easier to braid the dough when the top is still attached. An extra pair of hands help when braiding the dough but if you are by yourself it will just be a little messier. No worries

If some of the filling falls out, just scoop it back up and place it back on the dough.


Mediterranean Bread
Dough
1 tbsp traditional yeast
1 cup warm water (105˚F) 1/2 tsp honey 3 cup all-purpose flour 1/2 tsp salt 1/2 cup feta cheese, crumbled 1 egg 2 tbsp olive oil

Filling
1/2 cup feta cheese, crumbled
1/2 cup cooked spinach, drain excess water - If using frozen, no need to cook.
1/3 cup walnuts, chopped
1 tbsp butter 1/4 cup leek or 1 garlic clove, finely chopped

Directions
1. Combine warm water with honey and mix until dissolved. Add yeast and mix well. Set aside to proof for 10 minutes. While the yeast is proofing, combine flour, salt, and feta cheese. When the yeast is done proofing, add to the flour mixture and stir. Combine the egg and olive oil and then add to the flour mixture. Stir with a wooden spoon until mixture comes together. You can use your hands as well. Place the dough on a lightly floured surface, and knead for approx. 10 min, or until the dough becomes smooth and elastic. Put the dough in a large, lightly oiled bowl and cover it with a cloth. Let it rise in a warm, draft-free area until double, 1 hour.

2. While the dough is rising, prepare the filling. Combine the feta cheese, spinach, and walnuts in a bowl. In a small pan, add the butter and leeks or garlic, sautéing until soft. Add to the filling mixture, stirring until well combined.

3. When the dough has doubled in size, place on a lightly floured surface. Using a rolling pin, roll the dough into a 15x12 rectangle. Leaving a 1 inch border, spread the filling onto the dough. Carefully, roll-up the dough lengthwise. Before cutting, transfer the dough to a baking sheet lined with parchment paper. Using a sharp knife, position the knife 2 inches below the top and cut the dough lengthwise. Carefully, braid the dough, picking up any filling that might have fallen out and place back onto the dough. Place the tray in a warm, draft-free area, covered with a cloth and let rise for 1 hr.

4. After the dough has risen 30 min, turn the oven on to 400˚F and let it warm up while the dough continues to rise. Once the loaf has risen and doubled, bake for 35 - 40 min, until the crust is brown

5. Cool on a rack before cutting. Enjoy!


-post & photos by Teann Ingram