Wednesday, February 20, 2013

FASHION: Beachy Chic

Hi! I'm Kat from With Love From, Kat.  I'm so honored to be one of the newest Made by Girl Fashion contributors. My first post is a guide on how to look chic at the beach.  Spring is quickly approaching and I'm sure many of you have fun trips planned.  Miami, Hawaii, The Bahamas?  Do tell!  

A vacation is a vacation, but you should always look good because you never know who you may run into on the beach ;)  I paired this scalloped black bikini with subtle rose gold jewels, and included Grace Coddington's memoir because it is the ultimate beach read!


-post by kat tanita


Tuesday, February 19, 2013

Ankasa

Ankasa is a super cool home decor store here in New York City. I remember always walking past it but had never ventured inside. I guess it was mostly at night time, so it was closed. Anyhow, there are two locations, one on the Upper East Side & the other in Soho. The Soho location is much bigger but they're both equally gorgeous!!!

I was LUCKY enough to be invited to shoot the store & all the new home accessories they launched this season! My favorites are all the sequin skulls & lips - aren't they cute?  When you enter Ankasa, you'll notice some unique wall art, an array of exclusive products including pillows, bedding, furniture, lighting, wall art and accessories. Lots to see!


The Ankasa brand is run by Sachin & Babi, a talented design team who is sought after in the design industry for their couture handmade embroideries & unique textiles. If you're a New Yorker or just visiting, this store is a must-see!


Shooting the shop.


I even took my mom along while I was shooting - she loved the store - I bought her one of the white croc keychains, which I also have. Isn't she sweet?


-images by jen ramos


Monday, February 18, 2013

Life & Style Event at Henri Bendel

Last week I attended the Life & Style magazine panel event & let me just say, it was the first time I had been inside Henri Bendel. I know, I know....I hadn't lived in NYC for the last few years & now I can tell you I'll certainly be back. If you haven't been, you have to go!

So, the event went nicely, met a few people, mingled and got to see some cool flats from a company called Yosi Samra, the flats fold in half & are super chic! I should be getting a pair soon & will let you know how I like them. Enjoy!


Love this cute lips scarf - so beautiful in person too! We included it in the Love Letters digital mag issue as a matter of fact!


Is that LouAnn the countess? Yup.


With the gals from Life & Style.


The most amazing dark chocolate at Henri Bendel.  Dark chocolate & 24K gold. YES, it's edible.
Oh & it cost me a cool $10.


BAM!! Quick self-shot & cut off half my head by accident.....


Update:
They sent me some flats a couple days ago & they're  sooo cute! Super versatile, comfortable & they fold in half to fit right into my purse! These are the Crocodile Samara in black in case you're wondering.


-most images by jen ramos


Friday, February 15, 2013

Giveaway: Gold Love Print

Hi everyone! Still craving a little LOVE in your home after V-day? I thought it'd be cool to giveaway a few 8" x 10" Gold Love Prints for 10 lucky winners!!!!!

THE PRIZE:

(1) 8"x10" Gold Love print (10 winners)! That means we will choose 10 people to win!!!!  You're chances of winning are better here than the lottery. Ha!

HOW TO ENTER:

Must be a follower on my Twitter or Instagram or both (where the giveaway will be held)!

ON TWITTER:  

Retweet the image below.
No image, no possibility of winning. 

ON INSTAGRAM: 

#regram the image below! No image, no possibility of winning.
To regram, take a screenshot and post it with the hashtag. Or use the regram iPhone app.

MUST: 

Use hashtag #WANTGOLDLOVE on twitter or Instagram- so I can find all your entries! No hashtag, no winning. You can use either social media platforms, doesn't have to be both.


GIVEAWAY ENDS ON:

Tuesday, February 19th! We will choose 5 winners on Twitter & 5 winners on Instagram! Make sure to come back here, on the blog, and see if you've won!


-image by jen ramos


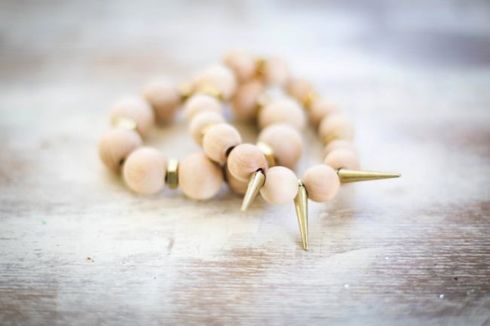
DIY: Bead and Hardware Bracelet

Hello Made by Girl readers! It's Stephanie from Henry Happened back with another DIY project. If there's one thing I love, it's making bracelets. 

And these are so insanely easy you won't be able to make just one. Read on for the how-to! 

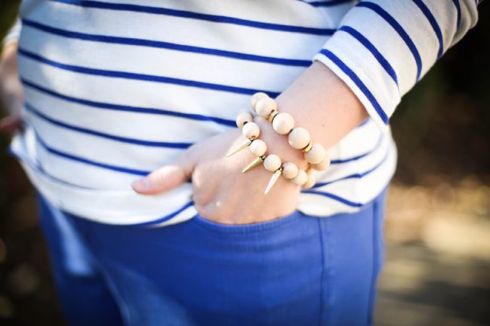
AZ0A1656 AZ0A1727 

With spring soon upon us I wanted a bracelet that was light, simple and stackable. Doesn't this time of year make you want to clean out all the closets and purge everything? 

When you're spring cleaning you might just find you already have most of the materials you need for this DIY. If not, it's a good excuse for a trip to Home Depot.

DIY Bead and Hardware Bracelets

IMG_3879 

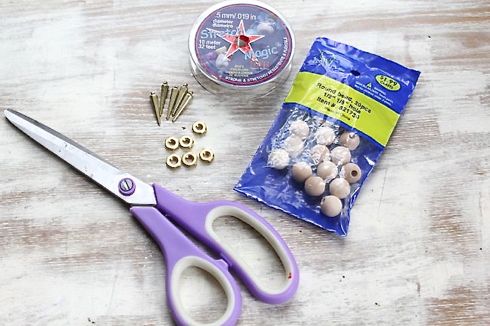
To make your own bracelets you will need:
  • Stretch Magic (found at any craft store)
  • Small wooden beads (Hobby Lobby is my favorite source for these)
  • 8mm gold hex nuts
  • Gold spikes are optional but make a fun addition
  • Scissors
AZ0A1729
IMG_3452 

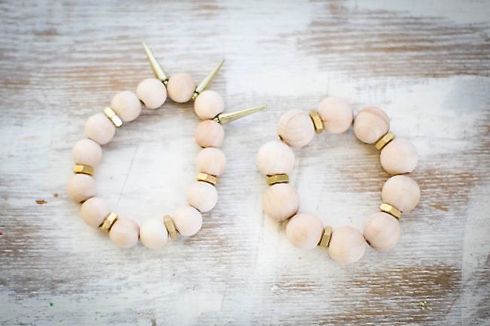
Start by stringing your beads and hex nuts onto the Stretch Magic. This stuff is super easy to work with. It feels kind of like fishing line but with stretch. My pattern was two beads followed by a hex nut, using about 10 beads. 

Measure your wrist to make it the length you need. Give it a bit of extra room though so it's not too tight. If it's too small the beads will stretch apart too much, exposing the cord.

 IMG_3456 

Once you are done stringing cut the Stretch Magic and knot it. Follow the package directions on making the knots because you don't want it to come undone.

 IMG_3458 

Clip the ends and you're done! Then you'll say, 'That was so easy, let's make more!' And before you know it, you're addicted to making bracelets. There really ought to be a hotline for that. 

AZ0A1655 

You can make all kinds of patterns with the beads and hex nuts. And definitely add some spikes for a little edge. You can't go wrong with spikes, right?


 -images Stephanie Gerber


Thursday, February 14, 2013

Sweet Gestures - Happy V-Day

Last night my husband went to bed early & do I went into his bathroom & left a note on his mirror. I figured he'd see it today.  So he was gone when I woke up & I found it unusual that he wouldn't leave a note back to me - I couldn't find one anywhere! So, I sent him a text & said, did you see the note I left you?

Sometimes he's in such a rush to get to work - he misses things....


He told me he saw it & loved it! So of course I said to him jokingly, "it's so strange you didn't leave a note back, it's not like you" - he said, "I did." - I was confused - then as I'm walking over to my computer and turned it on - BAM....this pops up! (see below)

It's 'sweet gestures' like this that let us practice our LOVE for each other - making love a 'VERB' as Andy Stanley would say. 


So, will today be a day full of LOVE for you? If not, try to surround yourself with family or friends, and enjoy today no matter what. 

Happy Valentine's Day everyone!!! 


-images by jen ramos


Food: Baked With Love

Happy Valentine's Day! Lauren here, and I love this month since it's all about sweet treats & little love notes, celebrating our significant others and also our girlfriends. I usually package up these heart cookies around Valentine's Day, but this year I was inspired to use my mom's sugar cookie recipe to create something new. 

Inspired by Jen's LOVE prints and colorful paintings, these painted LOVE cookies send a sweet message to their lucky recipients. I am not a gifted baker, so I promise they're incredibly easy too...they'd even be fun to make with kids! Keep reading for the rundown...

love cookieslove cookies

Whoops: I had a little kitchen accident and dropped one of my Anthropologie bowls, filled with flour, all over the floor. So I made the most of my mess and just photographed my ingredients right where it landed! My favorite part of these sugar cookies is the lemon...the lemon rind and juice add a subtle citrus flavor that really kicks them up a notch. 
 
love cookieslove cookies

I ordered this set of alphabet cookie cutters to create my L-O-V-E. Another fun option would be to use X-O-X-O.
 
For the dough:
 
1 cup butter, softened
1 3/4 cups powdered sugar, sifted
1 egg
2 teaspoons vanilla extract
Finely grated rind of 1 lemon
2 tablespoons lemon juice
2 1/2 cups all-purpose flour
1 teaspoon baking soda
1/4 teaspoon salt
love cookieslove cookies

As you can see, things may get a little bit messy, but that's okay! It's time to let your inner artist come through and not worry about making these perfect. Experiment with layering different colors on the paintbrush and trying different.
brush strokes. I used the edge of a sponge paintbrush we had on hand, but I'd actually recommend using a smaller art paintbrush. Just make sure it's brand new and hasn't been previously used with real paint. 

For the icing:

1 cup powdered sugar
1 tablespoon heavy whipping cream
Food coloring
Paintbrush

love cookieslove cookies

The final touch: See-through boxes that ensure your painted cookies are perfectly packed for gifting to loved ones at Valentine's Day. 
Makes about 3 dozen.

Instructions:
1. Cream butter and powdered sugar until light and fluffy. Beat in egg, vanilla, lemon rind, then lemon juice. Add flour, soda and salt; mix until blended.

2. Divide dough; wrap each half in plastic wrap and pat into a disc. Refrigerate several hours until firm.

3. On a floured surface, roll one disc about 1/4 inch thick. Cut with letter-shaped cutters (ex. LOVE or XOXO).

4. Transfer to a lightly greased cookie sheet and bake in a pre-heated 325-degree oven for 12-15 minutes, until barely browned. Cool on wire racks and repeat with remaining dough. 

5. To decorate, stir 1 tablespoon of cream into 1 cup of powdered sugar. Divide among small bowls and use food coloring to make intense shades.

6. Use a paint brush to paint the cookies with the icing, adding a little extra cream into the icing if needed to make it thinner. Wipe the paintbrush off in between, or even let a little color remain on the brush to overlap shades. Go back over each cookie with extra brush strokes.

7. Make sure you let the icing fully dry on each cookie, then stack into boxes.


-Recipe & images by Lauren Craig